INVISIBLE CITIES
completedFellowship
SummaryInvisible Cities: Performance Delivery & Robotic Performance Space is a project which develops a prototype of an interactive performance machine that can fit inside a pizza box. During the fellowship, Peter Lorenz and Johannes Bereiter-Payr refined its functionality, developed an open-source toolkit, and explored the "techno-dramaturgical" potential of this new performance format. Their work aims to make performance as easily accessible as ordering pizza.
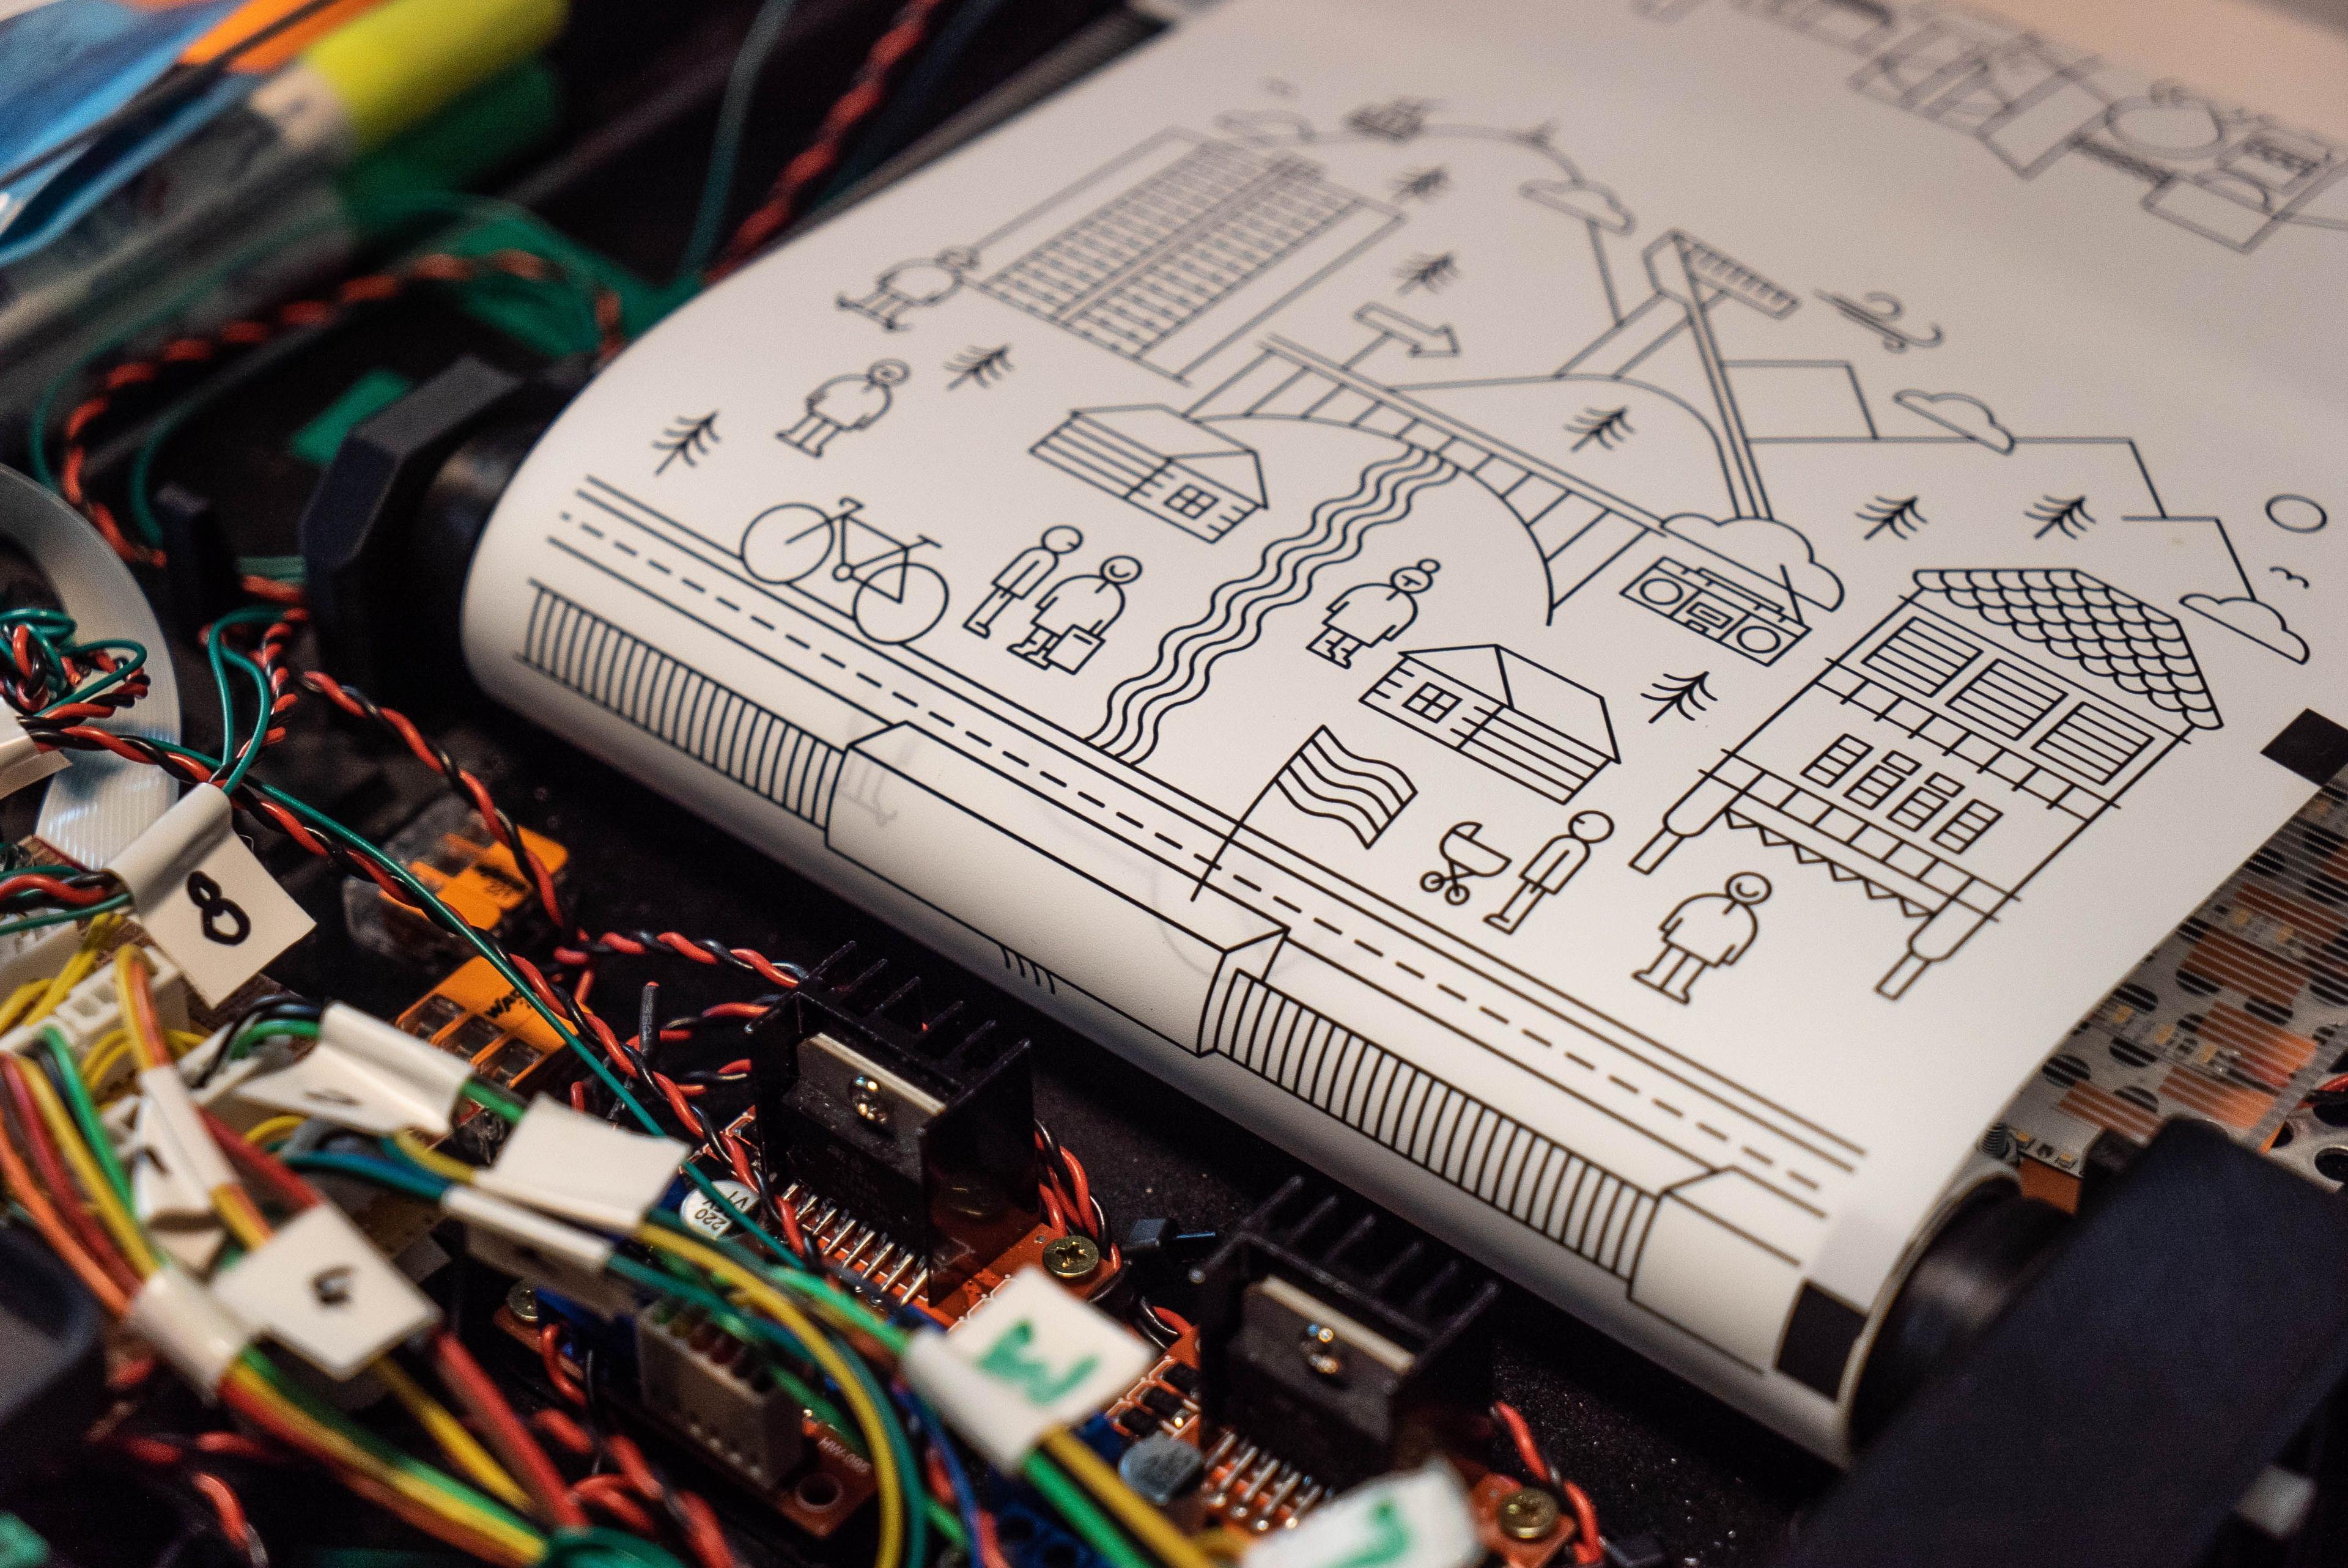
During our first joint project Invisible Cities Innsbruck, we started to develop an interactive performance machine that fits into a pizza box. This machine enables a haptic and participatory theatre experience that can be delivered directly to the audience’s home regardless of quarantine or lock down policies. Without human performers, the machine can talk to the audience, record responses, take photos and videos, and show images printed on tapes which are moved by mechanical scrolls, while respecting all public health and safety regulations.
In our research residency, we continued to develop the existing prototype of the machine and expand its basic functions regarding presentation techniques to permit more user interaction. This includes experimentation with new graphical, mechanical and light-based animation techniques, such as RGB colour filters and moiré effects. In doing so, we hope to bring new spatial and expressive dimensions to the performance in the pizza box by mechanical means. On the software side, we developed an abstraction language for the presentation modes of the box, which allows the scripting of complex storyboards, including the possibility for “choose your own adventure” style dramaturgies.
The goal was to develop the prototype into a reproducible open-source toolkit that can be used and replicated by anyone with access to modern rapid prototyping facilities (i.e. FabLabs) and filled with personalised content. Our research is informed by the intense dialogue between technology and dramaturgy, as we ask ourselves how dramaturgical building blocks can be implemented mechatronically and combined to make the performance machine as stable and versatile as possible. The result is a new performance format which can be filled with different contents for different contexts and thus reach new audiences directly in their homes. Our work aims at opening the established format of food delivery for artistic and dramatic content to make performance as easily accessible as ordering pizza.
In the course of the residency we also explore the potential of the technologies we employed on a small scale as techno-dramaturgical building blocks for more conventional theatre spaces and interactive stage machinery. In November/December 2022 we were able to test the new model of the performance machine in. the pizza box site-specifically in Berlin with Invisible Cities Kottbusser Tor .
HOW IT WORKS
The interactive performance machine in the pizza box is based on a Raspberry Pi single board computer (SBC) model 3 B or 3 B+, which controls the interactions with the audience. The main user interface are four buttons which trigger actions of the machine, e.g. start, advance through or repeat sections of the dramaturgy. The box speaks to the audience by playing back prerecorded sound files through speakers or headphones. Images on scrolls moved by motors and illuminated by LED strips illustrate the narrations. Furthermore, the machine can record sound and video with a built-in microphone and camera. The latter is installed in the lid pointing down onto the surface of the box to capture what audience members are drawing or showing on the box. Thereby the box can also become a stage for the audience to actively participate in.
MODELS AND PROGRESS

MODEL No. 1 IGL
We started our research based on a first prototype model No. 1 IGL which we had successfully used to deliver Invisible Cities Innsbruck to audiences. it fits into custom 5cm high pizza boxes. This model is battery powered and has one red and one blue button for advancing and repeating storyboard sections. It is able to record audio and video, play-back sound through internal speakers and show black and white illustrations on a single tape of backlight foil which is moved vertically by DC motors. The running time of the performance is 30-40 minutes and most of the construction parts are based on 3D-printed technology.
Only one box was produced, which still works as of January 2022 but was never replicated.
MODEL No. 2 SIBI
This model was a hybrid model which was replicated twice but never worked well due to technical problems. It contains a shortened version of Invisible Cities which takes a more abstract approach and is therefore also accessible to audiences who have no connection to Innsbruck. Rather than hearing and being asked about Innsbruck, this box uses the generic term “your city”. The running time is 10-15 minutes.
The containing pizza box is also 5cm high. The electronic controls utilize a Raspberry Pi Pico microcontroller in addition to the Raspberry Pi SBC. Being conceptualised for gallery exhibition and marquee-style presentations, it does not have a battery but works with a AC adaptor. It uses headphones instead of speakers and has a separate start button. Two perpendicular tapes are moved by DC motors, overlaying 2 images printed on backlight foil using an LED lighting system which can provide front- and backlight. It can be seen as a work-in-progress phase between the first prototype IGL and our final model RI since it combines solutions from the first model as well as newly developed elements. Despite two attempts of rebuilding it, technical issues due to electromagnetic interference between motors and sensors prevented it from working in a stable fashion.
MODEL No. 3 RI
The design of the final model RI is only 4 cm high so as to fit European standard-size pizza boxes. The mechanical construction is optimized for laser-cutting, only using 3D printed parts where it is absolutely necessary in order to save time in the manufacturing. It can be used with an AC adaptor or battery power from an internal LiIon-cell pack. Sound playback is possible through speakers or headphones. The electronic controls use a Teensy 4.1 microcontroller with an advanced sensor configuration for the two perpendicular scrolls. This allows the scroll movement direction to be recognized independently from the motor movements, as well as the ability to detect rips and other scroll-related malfunctions. The “stage light” LEDs are full color RGB+White and the audience has more interaction options with four buttons that allow non-linear “choose your own adventure” style narratives. The model RI is currently in active development. The plans and software code are open source and available via our git repositories for reproduction. The system provides a stable basic set-up that can be altered, expanded and developed further by the maker community.
RESEARCH QUESTIONS
Despite using the model paradigm in our project description, the research process cannot be separated so clearly into three specific models. Rather, they merely represent more or less arbitrary snapshots of our continuing experimentation. Another approach to describe our work in this residency can be taken by answering our research questions.
The first two questions - "HOW CAN WE EXPAND MODES OF INTERACTION WITH THE BOX?" and "HOW CAN THIS FORMAT BE TURNED INTO A REPRODUCIBLE OPEN SOURCE TOOLKIT?" - deal with the technical design of the box in software and hardware. We will explain our technical experiments and the redesign process in answer to the first research question, regarding all modules of the machine. The second question will be used to reflect on the ideas, process and documentation of the toolkit.
The other questions concern the context of the performance machine, which we researched alongside the technical development of the box. Question 3 ("HOW CAN INVISIBLE CITIES BE TURNED INTO AN ECOLOGICALLY TOURABLE PRODUCTION FOR OTHER CITIES?") focuses specifically on the practical application of our showcase performance project Invisible Cities, and is concerned with the format of that project, how it can be realised in different contexts / cities and therefore reach new communities and spread the application of the performance machine in the pizza box.
The final question, "HOW CAN THE PIZZA BOX TECHNOLOGY BE EXTENDED INTO A ROBOTIC PERFORMANCE SPACE?", concerns itself with the application of the technologies we are using for our pizza box for the theatre as a whole. It reflects on different spaces and the use of robotic or mechatronical systems for stages.
1. HOW CAN WE EXPAND MODES OF INTERACTION WITH THE BOX?
SCROLLS/TAPES
In order to expand the image world of the box, we wanted to extend the singular tape of the first prototype, IGL, with more tapes filled with images which can be overlayed on each other.

However, it soon became apparent that the optimal number and arrangement of scrolls for our purposes is two perpendicular tapes which can be moved in horizontal and vertical direction. Since we set ourselves a size limit for the performance machine to fit inside a pizza box, any scrolls in another orientation would further reduce the space that is available for viewing images. While theoretically it would be an option to split the horizontal or vertical scroll into two independent ones, this would also create an image free zone in the centre of the view port. Therefore we settled for two scrolls and addressing the challenge of even light distribution and the possibility of fading out the image on the back scroll. It also became apparent that the scrolls need to lie on top of each other as close as possible, so as to avoid the back image being blurred. Even fractions of a millimetre matter in this respect.
The scrolls are the largest 3D printed parts in the construction. They are printed in two halves down the central axis, which are held together by laser cut acrylic gears and rings. They are mounted with regular skateboard wheel bearings. The split construction also allows for an easy and fault-tolerant mounting of the image tapes, which are merely inserted between the two scroll halves. In case a motor does not stop when the band reaches its end, the tape just slips out of the scroll without ripping.
MOTORS
From the experience with our prototype model IGL, it was clear to us that moving the images on the scrolls accurately and reliably is one of the biggest challenges. We therefore prioritised this right at the beginning of our residency, not expecting that the problem would accompany us all the way to the end. Reliable and precise motor control is not an easy endeavour, and despite knowing this from the onset we still underestimated the problems in the implementation.

We chose geared, back-drivable DC motors because they are cheaper, smaller, lighter and much less noisy than stepper motors. In the first model, the scrolls were driven directly by the motors. However, this turned out to be less than optimal, as the motor axle tended to tear out of it’s mount in the 3D printed scroll. We therefore decided to implement a simple gear train between the motor and the scroll. This proved to be a great improvement, as the gears double as a cuff which holds the scroll halves together.
We chose Zhaowei 6V Motors due to their small size and nominal speed of 135 rpm. First test where conducted with 350 rpm motors, but despite a further speed reduction from the acrylic gearing, this turned out to be too fast. Another advantage of slower speeds is that the available torque is increased. At first we underestimated the force exerted by the tightly wrapped tapes around the scrolls. In the original design, the motors powering each scroll were attached in reverse to the same motor controller, with a diode on each motor lead so that inverting polarity on the controller only powered one motor. While this required fewer components and reduced complexity in the controller, we realized that the torque exerted by one motor was barely enough to pull the tape. This made the motor control unreliable, as it was always necessary to give the motors full power in order to move the tape. The solution was to control power for each motor individually, which allows us to run the secondary motor at slightly slower speed, which greatly reduces the tension on the tape and thus also the torque the driving motor needs to exert.
Another important aspect about the motor control is precise position control, i.e. how far the tape has travelled and when it needs to be stopped. This means that the device which reads the position encoding from the sensors needs to be able to operate in “realtime”. Our experience with the IGL prototype showed that the Raspberry Pi SBC is not a good choice for such tasks, which is why we decided to include a microcontroller for time critical hardware control.
Another problem caused by motors is electromagnetic interference. In model SIBI, we experienced issues with the motor control because one motor interfered with the position control sensors, causing the positions to be misrepresented. After narrowing down the problem from software to hardware and finally localising the motor as the source of the error, the mitigation was to equip the motors with dampening capacitors, and use shielded cables for the motor’s power supply and the sensor wiring.
SUPPORTS & MOUNTS
The prototype IGL relied heavily on the use of 3D printed parts. This created two problems: First, the fragility of the parts made frequent replacements necessary, especially in the initial testing phase. Second, the parts were relatively large, and thus required substantial time for printing replacements. Therefore, we decided to switch to a construction that can be mostly laser-cut from plywood (or MDF - see below). The four main parts can be slotted into each other and the base plate to form a sturdy base. Increased stability is reached by connecting all parts including the outer walls with screws.

All screwed couplings are made using square nuts which are inserted into slits in the receiving part with perpendicular holes to guide the screws. These holes need to be drilled manually after laser cutting. To streamline this process, we built a small drilling jig using a 3D printed base and brass tubing, which centers the drill bit and ensures perpendicularity. This allows all holes to be drilled with a hand-held machine, further speeding up the process.
The supports are the central structure of the box, holding both the motors and sensors (see below), as well as forming an enclosure for the light box. This efficient design stood at the beginning of our experimentation process, and was refined iteratively to also feature mounts for holding all cables in place safely.
Initially, we used 4mm and 8mm poplar plywood for prototyping on the laser cutter. However we noticed that the wood was of very variable quality, which impacted the structural integrity of the parts. We therefore switched to 3mm and 8mm MDF board for the final model RI. As this material is harder for the laser to penetrate, it prolonged cutting time substantially. The change also increases the weight of the box in comparison to it’s predecessors, however the increased stability of the resulting parts made the change worthwhile. For future iterations, we would recommend considering redesigning the parts from 8mm to 6mm wood, in order to reduce the weight, increase the space within the box (every mm counts) as well as reducing cutting time and burns of the laser cutting process.
SENSORS & TAPE MATERIALS
Since the prototype model 1 IGL we have been using optical sensors in combination with encoding bars on the backlight foil to determine the tape position. Since then, we have updated the sensor configuration and bar layout multiple times, but the electronic components for sensing are still the same as in the first device. In the course of prototyping experimentation we considered using sensors with a smaller form factor, however we noticed that the tape has a considerable lateral motion due to manufacturing tolerances in the entire scroll-mount system. Therefore our original sensor models turned out to be the best for the job. The sensors use optical transistors as a switching element, which need to be paired with different resistors depending on the material used for the tapes. Initial electronic prototypes therefore needed to provide means for exchanging the resistors depending on the tape material.

Finding the optimal tape material is an ongoing investigation which has still not shown a clear winner. In the first prototype we used backlight foil with good results. Being made of sturdy plastic, it is virtually indestructible. However, that can prove to be a disadvantage if the tape is affixed to the scrolls permanently, which resulted in the damage to the scroll-motor coupling in model IGL. Also, the foil is covered with a white coating which is a base for the print, but rubs off easily, especially along the cutting edges when the tapes are trimmed to size. Also, we realized in Dortmund that the base material comes in different thicknesses, but it can be hard to determine which thickness is used before receiving a sample, as most printers do not provide this information to their customers. The backlight foils we obtained from the local print shop turned out to be too stiff for our needs, as well as having long production times which were not conducive to our rapid prototyping process.
We therefore switched the material to regular tracing paper, which is also available in rolls, and can be printed by most copy shops with a much shorter turnaround time. The greatest disadvantage of this material is that it tears easily, as well as also being available in multiple thicknesses, each of which has its own set of problems. Nevertheless, we have decided to stick with it for now, but are still on the lookout for better alternatives.
STAGE LIGHTING
To be able to create transition effects between the images on the tapes, the new models can illuminate the “stage area” from the top as well as with backlight. Top light is provided by a side-lit screen of transparent acrylic which is mounted above the light box. The light itself comes from LED strips, which need to be mounted on a heat sink to avoid damage. The backlight is therefore mounted on 2mm sheet metal, while for the top light we used 4 x 10mm brass.

The first two models use white light only, which could be dimmed using the same motor controller board we also used for the motors. For the third model we switched to full colour RGB+W LED strips, which also allow the control of each LED individually through a one-wire communication protocol. While this is not (yet) used in our models, it allows many more possibilities in the present and future models.
POWER SUPPLY
The first prototype model No. 1 IGL used two consumer-grade power banks, one providing 5V via USB to the Raspberry Pi and one with 12V which we used for the motors and lights. They needed to be removed from the box for charging, which made box maintenance cumbersome. We therefore decided to switch to a single LiIon battery pack (3S2P) with separate converters for each module (i.e. lights, motors, sound and controllers). The box is delivered in standby mode and activated by opening the lid. In the latest construction, the battery is permanently fixed in the box and can be charged through an external charging port.
One remaining issue is that the power consumption from the four motors and lights is considerably higher than for the prototype model IGL. We estimate that with the current power consumption, our 6800 mAh battery is enough to sustain a one hour performance including delivery time. As motors tend to consume more power depending on the torque they exert, some power issues could be mitigated by fine tuning the motor speeds. In general the energy consumption of the entire system remains a field with high optimization potential. In future models, the box should monitor the power level autonomously, and also have a sleep mode for delivery.
AUDIO
Sound playback and recording is performed by the Raspberry Pi using a standard miniature USB sound card. This is necessary because the Raspberry Pi lacks a microphone input.

An advantage of this setup is that the wiring for the sound can be soldered on to the jacks of the card directly, which saves the space that would be needed for a plugged connection. For the microphone we use a passive table top stereo microphone which has a high recording quality. The internal speakers are driven by two miniature 3 W amplifier modules. The lid switch also controls the standby mode of the amplifiers.
The laser cut base for the microphone doubles as the cage for the battery, which makes excellent use of the cramped space conditions in the box.
VIDEO
Video recording is also managed by the Raspberry Pi using a 8 MP camera module. The PiCamera Python library supports recording in full HD resolution with 30 fps. However, the default file format is raw .h264 video, which makes post-processing necessary. Therefore the latest version of the software includes a routine which converts the videos to MP4 format after the performance playback has been completed. All recorded files are saved to a USB stick for easy access after the box has powered off. Files from every performance session are stored in a separate folder with a unique identifier.
USER INTERACTION/BUTTONS
We expanded the two buttons of the first model IGL (one for forward and one for backward) to four buttons in order to allow the performance machine to support more complex stories and non-linear dramaturgies. To indicate when the buttons accept user input, we decided to use illuminated buttons. A side effect of this is that we also have a possibility of informing the audience of the current state of the performance. For example, the red button can indicate that the audio recording is active, and blink when only 5 seconds of recording time remain.
However, for unknown reasons it was impossible for us to find a German supplier for four illuminated buttons in different colours which also fit into the 40 mm height of the box. We therefore used coloured buttons and added an LED of the same colour to show the audience when the button can be pressed. We hope to change this in future versions of the box, although we do find that the seperate LEDs give the box a certain 1980s flair.
CUSTOM PRINTED CIRCUIT BOARD (PCB)
We designed a custom PCB to hold the microcontroller and connect it to the peripherals (sensors, motor drivers, buttons etc.). This also is necessary to be able to build the performance machine in a workshop setting, as we found out during construction of the first model IGL that soldering a custom wiring interface on a prototyping board can be very challenging for unexperienced makers.
Assembling the electronics is a lot more failure resistant when connections are protected against mistakenly being plugged in the wrong way round. We therefore use standardized connectors with mechanical reverse polarity protection for all peripherals. Using crimped JST XH connectors also makes it a lot easier to assemble the many wires that are needed to connect the sensors.
SOFTWARE FOR RASPBERRY PI AND MICROCONTROLLER
Already in the first model IGL we began writing a Python package which can be easily deployed and run as a service on the Raspberry Pi. We use the click Python library to create a command line interface which can be parametrized to be used for testing the assembly and to run the performance on delivery. As stated above, the original software was intended to control the motors and lights as well as play and record audio. While the direct control of the hardware turned out to require a separate microcontroller, large portions of the original Python software could be reused for the modular design of the architecture.

Our first choice for a microcontroller was the Raspberry Pi Pico, due to its support for the Python programming language (specifically MicroPython). As the main code running on the Raspberry Pi SBC is also written in Python, it seemed attractive to be able to reuse the control algorithms already written in the same language. However, it turned out that despite claiming otherwise, MicroPython is not suitable for critical realtime applications. Therefore, we replaced the Pico with a Teensy 4.1 microcontroller, which is compatible to the Arduino framework and is programmed in C++. We also switched the programming environment (IDE) to Platformio and VS Code. This proved to be a much more stable experience on the whole. Due to the high clock frequency of the CPU, we are now able to control the motors and the lights simultaneously without losing control over the tape position.
The Raspberry Pi and the microcontroller communicate via a serial interface, using a simple custom protocol. We use hardware based serial ports on both the Pi and Teensy. On the microcontroller side we found the Simple Serial Protocol library to cover all our needs, while the Python communication side was custom built using the PySerial library.
All code and documentation can be found on our GitHub repository.
VISUAL EFFECTS
FULL COLOUR IMAGES: It is not only possible to use the full range of colour in the LED lights but also the illustrations printed on the scrolls can be in full colour. However, for overlaying the images on the two layers of scrolls, care needs to be taken in the design process not to use too many deep colours on the top layers, so that the bottom layer can still shine through. We advise using colours sparingly for visual effects, as described below.
RGB COLOUR LIGHTING: From the outset, our goal was to expand the possibilities of the image world of the box through movement. We realised that there are more ways of creating an animated moving image other than physically moving the illustration. One aspect we explored was using changing Red, Green and Blue light to make elements printed in similar colours appear and disappear. We found that prior work by other artists has been done in this direction, and conducted some tests based on this principle. We could show that it is possible with the performance machine, although rapidly flashing lights are a seizure hazard and therefore care must be taken when using them in an uncontrollable environment. However, we also found that this technique can be used for more gentle animations, as described below.
RGB APPEARING AND DISAPPEARING IMAGES: As a result of the RGB animation effect tests, we realised that it may be more appealing for visual storytelling to make a coloured elements appear or disappear through changing the lighting. For instance yellow lines on an image can be made to “disappear” when illuminated in red, but appear black when the light color changes to blue. This mirrors the visual effect that can be achieved through changing between backlight and front light, without the need of an additional scroll layer. As different light colours are also used to change the “mood” of a classical theatre set, we are excited to see this possibility for expanding the abilities of our performance machine even further.
MOIRÉ PATTERN ANIMATIONS: Another visual animation effect we experimented with was the Moiré Pattern, which uses visual interference patterns to trick the eye into perceiving movement. We were able to make one image contain three to five frames which were only visible to the eye when a layer of black stripes was slowly moved beneath it. We realised that the image needs to be on the back (horizontal) foil and the stripes need to be on the front (vertical) foil to work best.
However, the results of the effect were not entirely convincing, for two reasons: firstly, to work best the two layers need to be in accurate focus, which is not always the case in our scroll setup and secondly, the speed of the movement needs to be matched precisely to the width of the stripe pattern. Due to the high mechanical resistance of pulling the tapes, we are currently not able to drive the tapes at arbitrary speeds, so the only variable we can fully control is the stripe thickness. This limits the applications for which this effect is fully usable at the moment, although it definitely bears interesting possibilities for theatrical application and would also be interesting for further exploration in a large scale set design.
OTHER MODES OF INTERACTION
We originally planned to include research into other modes of interaction with the box by testing different sensors as possible user inputs, as well as different possibilities for visual outputs, such as moving parts such as a kind of shadow-puppet theatre. However, time constraints and the available physical space in the machine let us abandon these ideas in favour of focussing on making the basic functions stable. This way, we can be confident that the machine will be used by us and others in the future, and further extensions and new functions can be added in coming iterations, should the need arise.
2. HOW CAN THIS FORMAT BE TURNED INTO A REPRODUCIBLE OPEN SOURCE TOOLKIT?
Our goal to share our results as well as the finished performance machine online as an open-source toolkit informed some key choices. We want to prioritize reproducibility and simplicity as far as possible. This means minimizing the number of different (manufactured) parts and (sourced) components as possible. We try to guide our choices in the part design by their reliability, but also their availability in the future (as far as possible). This is not easy in the current chip crisis and the rapidly fluctuating online market. Ultimately, we also wanted to keep the box as cheap as possible, so that the economic boundary of using the toolkit is as low as possible. For this purpose we also lowered the height of the machine from 50 mm in model No. 1 IGL and model No. 2 SIBI to only 40mm in model No. 3 RI. This corresponds with the standard size for pizza boxes in Europe, so that regular pizza boxes can be used and sourced cheaply instead of having to order custom built boxes.
We try to document all aspects of production and procedures as clearly as possible in our git repository. We intend to update the instructions as we learn with future iterations and performances, and encourage every person or team who is bold enough to attempt to reproduce the machine on their own to do the same. We are also sharing not only the design files, but also our entire bill of materials with all source links we used to order the components. Despite this, it is clear to us that to really live up to the promise of reproducing the machine relying on our documentation alone, much more work is needed. While we hope that future iterations of the box will improve the quality of the documentation, we acknowledge that building and maintaining an open source project of this scale and complexity is probably not possible for two freelance artists who are working on multiple projects.
In the course of the fellowship we came to realize that our main research is whether it is even possible to create a stable and reproducible machine as an open source toolkit in the context of artistic research. The underlying core of the matter surrounds the question how much artistic process is left in the act of product development, and whether we as artists are able to sustain this kind of rigor within the context of an arts production. In industry, product development in a project like this would involve many experts and their assistants working alongside each other for a considerably longer time than the five months of the fellowship. We came to realize that we are only two dilettantes who joined forces and experiences. Despite having experience in some fields of knowledge we needed for this project, much of the learning of the processes involved took place along the way. Our work shows, that every step in the direction of more standardization and reproducibility increases the workload exponentially, to the point where both our human resources and expertise becomes overstretched. This work is therefore, as all other artworks, a compromise between our abilities and our resources, and a monument to our ambitions as much as a reminder of our shortcomings.
Despite this, we are proud to announce that we have developed the performance machine in the pizza box to a point where we as individuals are fully able to reproduce the machine, and have amassed enough expertise to be able to adapt it for uses by other artists and theatre groups. We can also claim that we have reached a level of performance stability which makes us confident that we are able to support not only our own dramaturgies, but also facilitate adaptations of other performances for display in a pizza box.
The model RI has been successfully used as a presentation model at the end of our fellowship in Dortmund as well as reproduced in 2022 for “Es war einmal” at Landestheater Linz and rebuild for Invisible Cities Kottbusser Tor in Berlin.

3. HOW CAN INVISIBLE CITIES BE TURNED INTO AN ECOLOGICALLY TOURABLE PRODUCTION FOR OTHER CITIES?
Our showcase project for the performance machine is inspired by Italo Calvino’s novel “Invisible Cities” and tries to make the plurality of different lived realities in every city visible. During the residency in Dortmund we developed the format that we tested as a prototype 2020 in Innsbruck further to enable it to be toured to any city around the world while trying to reduce the ecological footprint of the production. We facilitate this through involving as many local resources, communities and FabLabs / Makerspaces as possible. The goal is to reduce the travel of people and materials as much as possible.
In our touring template, we will work for two weeks with a variety of local communities to accomplish two goals. First, develop localized city versions for prerecording onto the boxes before delivery. Second, build around 5 boxes ready for delivery together with local volunteers. This way the boxes can be refilled with authentic city versions that emerged from the respective neighbourhoods. At the same time we build a diverse audience for the delivery by bringing together people from different backgrounds. Furthermore, the collective building workshops transport hands-on knowledge about rapid prototyping technologies (e.g. laser cutting, 3D printing) and localized means of production in Makerspaces to communities. We see this as a means to spread knowledge of egalitarian and distributed production through action, which we believe can shape the future and allow us to build a more sustainable society. At the same time this will increase identification with the boxes, so that when the performance machines stay in the towns after the projects, the communities should feel empowered to use them again and fill them with their own contents. After the building we will deliver the performance machines and close the project by exhibiting the user-generated content in public space as a communal event.
Ideally, we use a local Makerspaces or comparable infrastructure to Lasercut, 3D-print and construct all parts in situ (as we did with Grand Garage in Linz as well as HappyLab and GoodLab in Berlin). This has the advantage of fostering connections between artists, the maker community and all other cultural communities involved in the project. However, if local production is not possible, we are able to manufacture all parts in advance and bring them along as well as our own mobile electronics workshop equipment. We have also tested a workflow for remote software support, so that we can provide the same level of quality with less travelling persons. We can also offer this service to communities or individuals who want to attempt to build a performance machine on their own.
4. HOW CAN THE PIZZA BOX TECHNOLOGY BE EXTENDED INTO A ROBOTIC PERFORMANCE SPACE?
Alongside our technical research in improving the performance machine in the pizza box, we kept asking ourselves how the technologies we are using in a small form factor can be applied to other theatrical contexts to shape a robotic performance space.
STAGE MACHINERY
A traditional proscenium arch stage machinery is in itself an input-output machine that works as a hybrid between robotic, mechanic and human agents which process cues, change lights and scenery. In such a context it would probably be considered a downgrade to use an enlarged version of our performance machine. However, it would be interesting to test sets based on the visual animation effects we tested such as the RGB and Moiré effects.
STUDIO SPACES
We saw a certain potential to create a set-stage machinery in different spatial configurations such as black box studios or site specific performance spaces. This could allow audience members as well as performers to move in and around an electromechanical moving stage machinery which could be an enlarged and much more complex system of tapes. The drawings may be constantly made and remade by performers and machines, while instead of front- and backlights, illumination may come from stage lighting profilers and projectors. The adaptation of the dimensions of all elements as well as working out the compatibility with DMX-controlled lighting systems would form the basis for creating a detailed technical concept that could include plans and models to help these technologies be implemented and applied as interactive stage machinery in theatres and performance spaces.
INTERACTIVE PROPS
Based on the Raspberry Pi and microcontrollers we explored, we are able to develop a wide range of interactive props that use different in- and outputs to create desired effects. During our fellowship we taught a two day workshop on interactive prop making as part of the PlayON! Network for Pilot Theatre from York and Theatret Vårt from Molde at the NTNU University in Ålesund. This workshop format combined technical instruction and consulting with techno-dramaturgical consultations and can be adapted to different contexts and formats between one and five days.
TECHNO-DRAMATURGY
As part of our research and workshop activities, we realised the importance of techno-dramaturgy in the process of applying digital technologies to theatrical productions. This means applying dramaturgical questions already from the beginning of the technical development:
- Why do you want to use the specific technology?
- What do you want to tell and how does the technology help with this?
- How does the technology appear, what does it mean and how does it perform itself?
- What role does the technology play in as an actant within the (meta)narrative of your project?
Essentially, this is based on the assumption that the technology itself is not the artwork but the medium and facilitator which helps the artwork speak to audiences and therefore, needs to be incorporated into the artwork with as much dramaturgical care than all other production elements.
LESSONS LEARNED, AND CONCLUSION
During our fellowship we made some observations of our own work, which also have implications for other techno-artistic devices, “interactive props” and other artistic machinery. We share them here, as we think that they might be helpful to others who are trying to implement new forms of theatre or art using technology.
TIME
Take as much as feels right and then double it (or multiply with pi) because the time for technical development processes is always vastly underestimated. All along the process accidents may happen and unexpected delays may occur: from conceptualising and planning, ordering parts and getting them delivered, prototyping and experimenting, assembly and integration as well as finally trouble-shooting. Hence, plan to finish way ahead of the deadline (e.g. rehearsal start).
CONCEPT & PLANNING
The simpler, the better and if there is a readymade solution use it. However, if you end up creating your own solutions, ask yourself why? Be flexible in your plans and always have at least one backup - plan that includes accounting for possible hardware and software failures. In times of a pandemic, prepare for remote work and quarantine.
Also, make a conceptual cut between brainstorming and planning phases. After you have determined what would be possible, take a step back and consider which of these options is necessary to make your production work. As time is always limited, it is better to concentrate on fewer features and do them right.
In projects which involve precise mechanics and software to work together, it is advisable to first design the mechanical construction as far as possible, and only then begin implementing the control software. Working with unfinished design prototypes sometimes does not save time, as you may be working around problems which are not present in the finished version. Also make sure that you have a means to test the reliability of position sensors and other key components during development.
ORDERING EQUIPMENT
Always look at the data sheets in detail before ordering and be aware that the ordering process itself takes time to find the right product at the right shop. Then, delivery takes even more time, especially during a pandemic and chip shortage but also leading up to Christmas. Shops from China might be cheaper but often take longer to deliver.
INTEGRATION
Make sure all parts work and communicate with each other correctly. Just because components work individually does not mean they work together. Therefore, test with all components in real time and if something does not work, check all parts separately. This step often takes considerably more time than expected.
ELECTROMAGNETIC INTERFERENCE AND GROUND
Make sure that circuits and components share a common ground. If necessary use shielded cables to avoid electromagnetic interference. This is especially important for serial communication.
POWER
In performance-critical devices, consider power management: - How do you know it needs charged? - How do you charge it? - How do you switch it on and off, and is there a sleep mode?
Always recharge batteries to full, mark full and empty batteries and always keep at least one spare back-up battery.
HANDLING
Consider the handling of the equipment:
- In which states can the program/object be?
- What does it do during idle state?
- Who will charge it?
- Who will switch it on and off? If it needs boot time
Prepare a pre-show/pre-use checklist and a list of common errors that already specify who or which department is responsible (e.g. for construction, for checking, for maintenance, for repairs, for power and charging).
Audiences might interact or react in the most unexpected ways, so make sure to test all devices with people who have never seen it before. Guide the audience with clear instructions and consider facilitators to help during the performance.